

ERA Workflow
See ERAs.
Electronic Remittance Advice (ERA) can be processed manually, automatically, and semi-automatically. Below are the steps outlined to get your office set up to start receiving ERAs and process them.
Initial Setup Requirements
To start using ERAs, offices must sign up for ERAs with their clearinghouse and participating insurance carriers.
- Automatic download of ERAs is supported through ClaimConnect E-Claims, Denti-Cal, Change Healthcare Medical/Emdeon Medical, and Electronic Dental Services.
- Not all insurance carriers or clearinghouses offer ERAs, or the ability to automatically download. If automatic downloads are not available, manually download ERAs following the steps found on ERA Troubleshooting.
Some setup is needed in Royal dental Software to enable ERAs. If you have not setup your clearinghouse in Royal dental Software, see Clearinghouse Setup.
- Ensure the Royal dental Software Service is installed and running on the server.
- In Clearinghouse Setup, check Receive Reports by Service
- In Clearinghouse Setup, double-click on your clearinghouse. Ensure Download ERAs is selected and that there is a designated report path. (i.e. C:\ClaimConnect\Report\).
- Ensure users have Permissions for Insurance Payment Create.
- In the Send Claims window, click Get Reports, select your clearinghouse, then check for a successful connection to your clearinghouse server.
- (Optional) Enable ERA Automation (automatic processing) in Preferences.
Once this initial setup has been completed, offices are ready to begin receiving and processing ERAs. Proceed to one of the sections below to process ERAs.
Manually Processing ERAs
If ERA Automation is set to Review All in Preferences, users will need to process all ERAs manually:
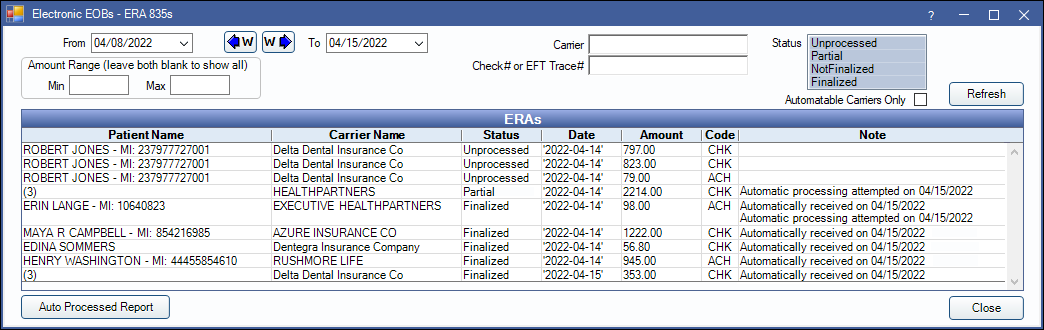
- From the Manage Module, click ERAs
- Verify the date range is correct. Enter any criteria to filter the list.
- Double-click an ERA to see the ERA - Electronic EOB (e.g., attached claims and payments).
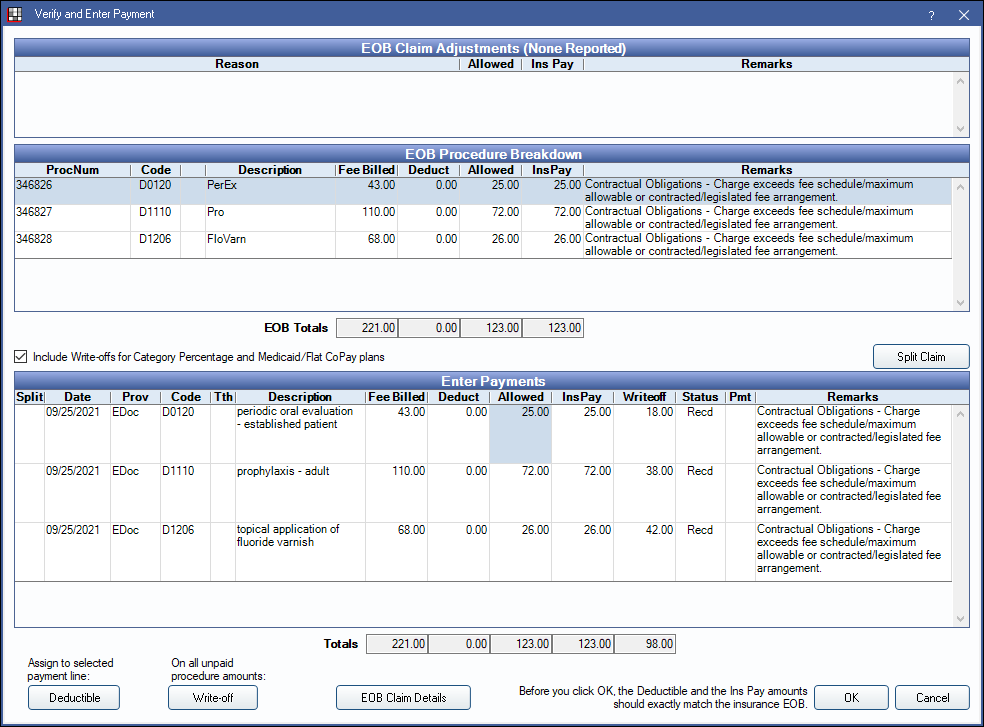
- Double-click on a claim to process payment.
- Verify the amounts being entered are correct.
- Click OK to mark the claim as Received
- If multiple claims are included on the ERA, repeat steps 4-6 as needed for any remaining claims.
- Once all claims in the ERA have been marked as Received, click Finalize Payment. See Finalize Payment on Process ERA.
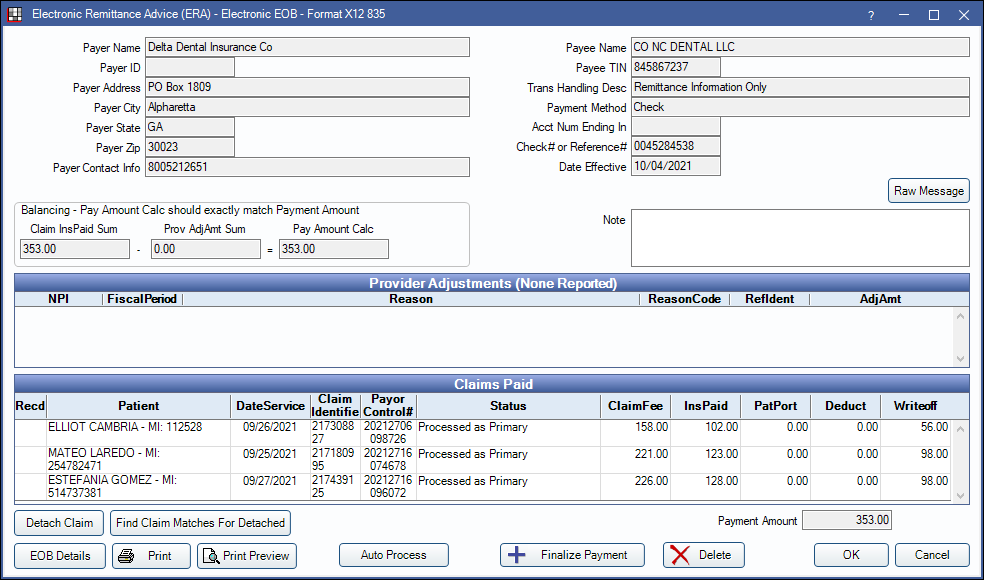
Detaching a Claim
If a claim cannot be processed in the ERA window, the claim can be detached and payment information entered manually.
- Select the problem claim from the Claims Paid grid.
- Click Detach Claim. Once detached N/A will appear in the Recd column for the selected claim.
- Right-click on the detached claim; Select Go to Account.
- From the Account Module, enter payment details and receive the claim as normal. See: Receive Claim.
- Repeat steps 1-4 as needed for any other claims that need to be detached from the ERA.
- After all claims have been received on the ERA (Recd column marked X) or detached from the ERA (Recd column marked N/A) and received through the account module, finalize the payment as batch outside of the ERA window. See: Batch Insurance Payment.

Semi-Automatic ERA Processing
If ERA Automation is set to Semi-automatic in Preferences, users can process ERAs with a single click in the ERA window:
- In the ERAs window, double-click on an ERA to see the attached claims and payments.
- Click Auto Process.
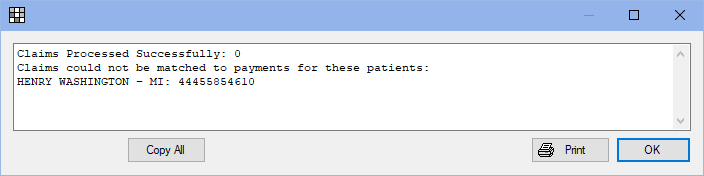
- All claims associated with the ERA will be automatically received or an message will pop up to list any problem claims.
- If there are any errors, correct them as needed. Click Auto Process again. If necessary, follow steps to for Detaching a Claim above.
- If all claims on the ERA Auto Process successfully, payment is automatically finalized.
Fully-Automatic ERA Processing
If ERA Automation is set to Fully-automatic in Preferences, Royal dental Software will automatically match claims from the database to claims on the ERA without any work needed from the office:
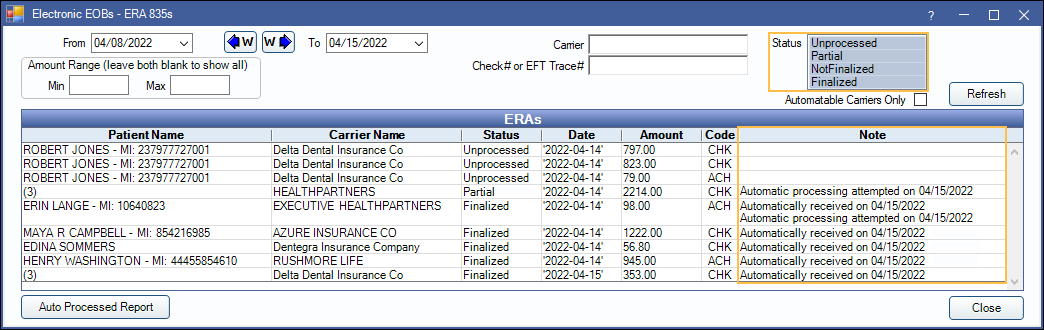
- To see ERAs that have been automatically processed and finalized, open the ERAs window. Select the Finalized status filter. ERAs that have been finalized by automatic process will show a note. A note will also indicate any failed attempts.
- Users can also see a list of partially or fully processed claims by clicking Auto Processed Report in the ERA window. See: ERAs Automatically Processed Report
- For ERAs that failed to Auto Process, double-click them from the ERAs list and follow the steps for Semi-automatic or Manual ERA processing above.
Additional Information About Semi and Fully-Automatic ERA Processing
Automatic ERA processing will:
- Match claims from the database to claims on the ERA. This will also reassociate claims that were manually detached from an ERA using the Detach Claim button on the ERA window.
- Apply the payment for the claim to an insurance payment plan if only one valid payment plan for the claim is found.
- If multiple valid payment plans are found, the claim must be processed manually so that a payment plan can be chosen by the user.
- Create Claim Snapshots.
- Attempt to process as many claims as possible. If an error is encountered while processing only one claim on an ERA, the system will receive the other claim payments and leave the ERA in a partially processed state without attempting to finalize a batch insurance payment.
- An ERA may also be left in a NotFinalized state if all claims are processed, but an error was encountered when attempting to make the batch insurance payment. If errors are fixed and auto processing is attempted again, the system will skip any claims that have already been processed.
- Enter initial payments, supplemental payments, reversals, and preauthorizations. Claims and Claim Procedures ( claimprocs ) will have their status changed appropriately and date received will be updated.
- Create a batch insurance payment for the ERA. The Carrier Name, Check#, Type, Amount, and Clinic will be filled. The payment date will be set to the date it auto processes.
- Create an auto deposit if Insurance payments show auto deposit is enabled in Preferences.
Automatic ERA Processing does not:
- Set the allowed override for claimprocs or update allowed fee schedules.
- Prompt the user to handle secondary claims when Prompt for secondary claims is enabled in Preferences.