

eClipboard Setup
In eServices Setup, click eClipboard.
To begin using eClipboard, first Sign up for the service.
 See our webinar: eClipboard.
- eClipboard can be found on the App Store, Google Play, and Microsoft Store.
- Details on using the app can be seen here: eClipboard: What Patient Sees, eClipboard: Treatment Plan, eClipboard: Payment, eClipboard: Payment Plans.
- Also see eClipboard Troubleshooting
Setup Options
Use Defaults for this Clinic: Check to use default settings for the selected clinic. Uncheck to change settings for the selected clinic.
Clinic: Select clinic from the dropdown to create clinic specific settings.
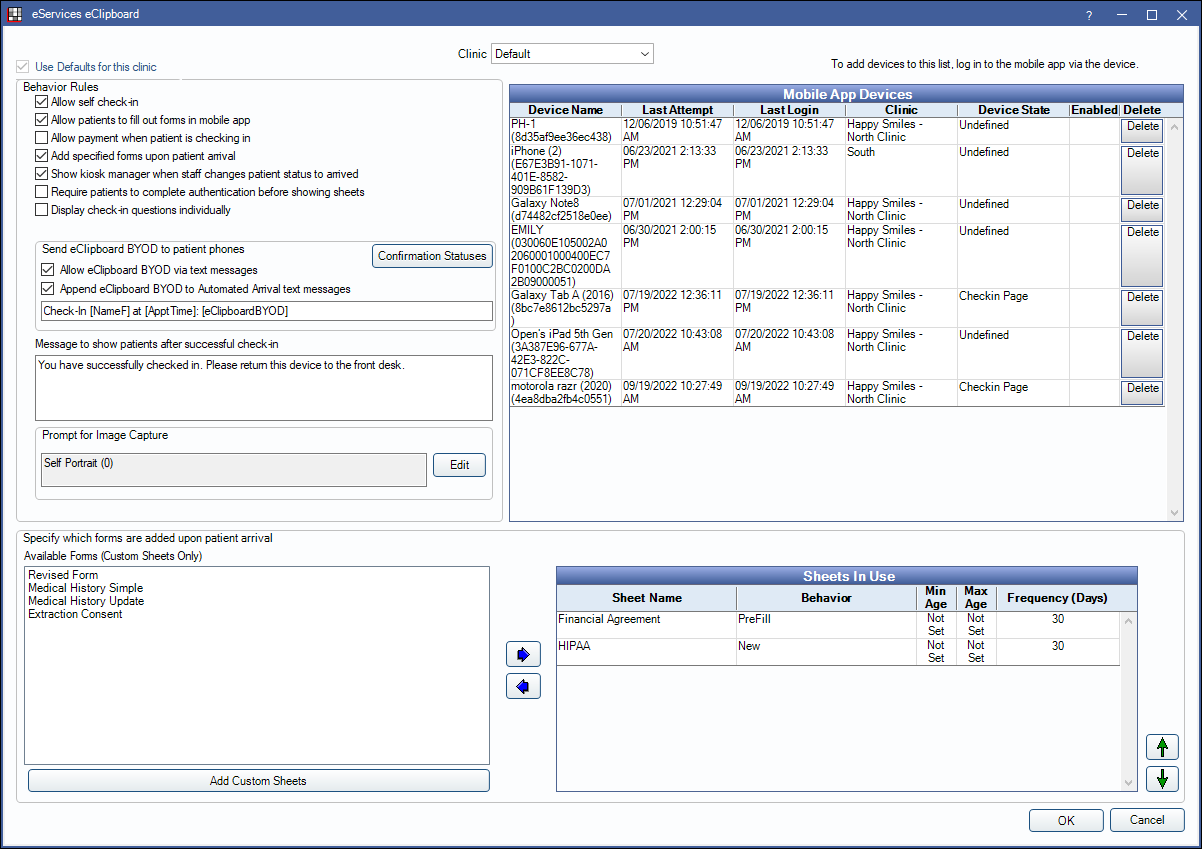
Behavior Rules
Determine the behavior for the eClipboard app.
- Allow self check-in: If checked, patients are allowed to search their own name, select their appointment and check-in. They will be marked as arrived, and added to the Waiting Room.
- Allow patients to fill out forms in mobile app: If checked, the app will function as a Kiosk where patients will be able to fill out forms while checking in via the app.
- Allow payment when patient is checking in: If checked, allows patients to view statements and make a payment. Only available for XCharge (OpenEdge) or PayConnect users. See eClipboard: Payment.
- Add specified forms upon patient arrival: If checked, forms defined below will be added automatically upon arrival.
- Show kiosk manager when staff changes patient status to arrived: If checked, Kiosk Manager will be opened for user who sets patient as arrived to allow forms to be sent to the app.
- Require patients to complete authentication before showing sheets: If checked, patients must verify identity before forms can be filled. Patients can choose to have a 6-digit code sent to their phone number or email address, then they will enter the code into eClipboard.
- Display check-in questions individually: If checked, patients are prompted to enter First Name, Last Name, and Birthdate one prompt at a time, rather than all at once.
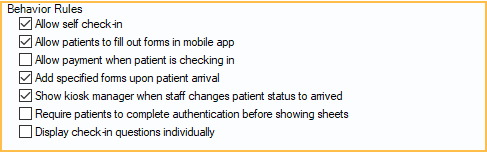
Send eClipboard BYOD to patient phones
BYOD (Bring Your Own Device) allows patients to fill out forms via eClipboard from their mobile device. Requires the Integrated Texting Feature eService.
- Confirmation Statuses: Opens Automated Messaging Advanced Settings.
- Allow eClipboard BYOD via text messages: If checked, allows a link to be sent to patients to check in and fill out forms via the eClipboard App. Patients install eClipboard to their device, then use the link provided to log in.
- Append eClipboard BYOD to Automated Arrival text message: If checked, and the office is using Arrivals, the [eClipboardBYOD] tag is added to the end of the initial arrival text message. The tag adds a link for patients to follow to install eClipboard. Arrivals are only available for offices using eConfirmations.
Additional Settings
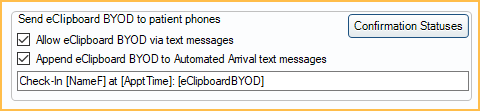
Message to show patients after successful check-in: Create personalized message to display in app once patient completes check-in.
Prompt for Image Capture: Click Edit to allow patients to take images of insurance cards, IDs, patient selfies, and more. See eClipboard Images for details.
Specify which forms are added upon patient arrival
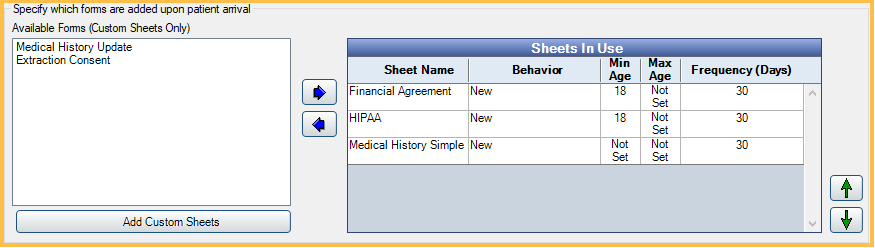
- Available Sheets (Custom Sheets Only): Custom sheets available to be added for use in eClipboard. Sheets must have Mobile Layout enabled. Select a sheet in the list and use the blue arrow to move it to the Sheets in Use grid.
- Add Custom Sheets: Click to open Sheets to add more custom sheets to the list of those available. Only custom sheets with a type of PatientForm, MedicalHistory, or Consent can be added.
- Sheets In Use: List of sheets added upon patient arrival. Highlight sheet in grid and use blue arrow to remove sheet from use.
- Sheet Name: Displays sheet name.
- Behavior: Displays the behavior for the form.
- Min Age / Max Age: Displays the minimum and maximum age for patients who need to fill the sheet. If no age restriction is added, Not Set will display.
- Frequency: For sheets with a behavior of New or PreFill, displays the number of days before a patient will prompted with a sheet again once they have filled it out.
Double-click a sheet in use to edit the rules.
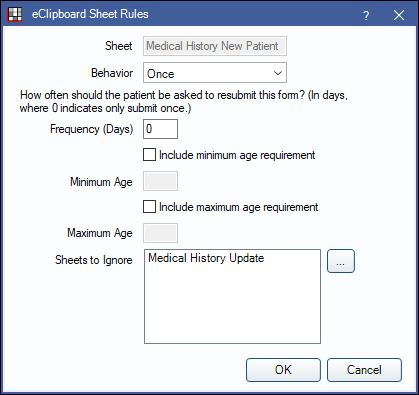
- Sheet: Displays the sheet name.
- Behavior: Select the sheet behavior. Options include:
- New: Patient fills out a new sheet every set number of days.
- PreFill: The sheet will display every set number of days.
- If a revision has been triggered, and the set number of days has passed, the patient will be given a new blank sheet to fill.
- If no revision has occurred, and the set number of days has passed, the patient is given a pre-filled copy of the sheet to review. See Pre-Fill Logic on Patient Forms for more details.
- See the Sheet Revisions section on Edit Sheet Def for more details.
- Once: Only needs filled once per patient. Once filled, patient will not be automatically prompted to fill again, unless the sheet has been revised.
- Frequency (Days): For sheets with a behavior of New or PreFill, enter the frequency (in days) at which to prompt a patient with the sheet again once they have filled it out.
- Include minimum age requirement: Check to enable a minimum age for the patient to fill out the form. (e.g. Set 18 if minors do not need to fill the form)
- Minimum Age: Enter the minimum age.
- Include maximum age requirement: Check to enable a maximum age for the patient to fill out the form.
- Maximum Age: Enter the maximum age.
- Sheets to Ignore: Only displays when Once is selected. Click [...] to select from sheets with the same sheet type. When a patient fills out the selected sheet, they will not be prompted to fill out any Sheets to Ignore, even if these are in the Sheets in Use list.
- For example: If an office has both the Medical History New Patient and Medical History Update sheets listed under Sheets In Use, both would normally populate for a new patient to fill out, which is redundant. To avoid redundant forms for new patients, set Medical History New Patient to a behavior of Once and list Medical History Update as a Sheet to Ignore. Next, set the Medical History Update for to a behavior of PreFill. This will only populate the Medical History New Patient form for new patients. The Medical History Update form will be populated for subsequent visits as needed.
Mobile App Devices
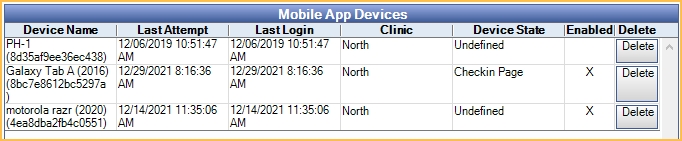
List of tablets and smartphones that have logged into this database via the iOS, Android, or Windows eClipboard app. Click in the Enabled row to make devices active for use.
Columns:
- Device Name: The device name logged into the database. Device names can be edited on the eClipboard Device in the About menu.
- Last Attempt: The last time the device attempted to log into eClipboard.
- Last Login: The last time the device logged into eClipboard.
- Clinic: The clinic associated with the eClipboard device.
- Device State: Displays which stage of the eClipboard the device is currently in.
- Enabled: Click to enable this device to access eClipboard. Click the X to disable eClipboard access.
- Delete: Delete the device from the list.
Device Setup
Install eClipboard to each device being used in the office. If asked to allow notifications, select Yes.
Launch the app and login using the credentials created for eClipboard during eServices Signup.
Once logged in, the device will list in the Mobile App Devices grid in the screenshot above. Click in the Enabled column on each device to make it active for use.
Lock eClipboard to prevent patients from accessing other areas of the device.
- On Android, enable Pin Windows.
- On iOS, enable Guided Access.
If using BYOD, see BYOD: Workflow and BYOD: What Patient Sees.
Appointments
A patient must have an appointment scheduled for today's date for eClipboard to populate their information. If the appointment is on a different day, or the patient is new to the office, have them go to the front desk. Once they are scheduled for today's date they may use eClipboard.