

eServices Signup Basic
The Basic View is a simple view of eService sign up options.
In eServices Signup, click Basic View.
This view opens by default when there is only one location / clinic.
Note:
- Fees displayed on the screenshot above may not be current. Refer to Fees for Support and Services for the most up-to-date pricing.
- For Royal dental Software Cloud users, this window will open in a new web browser session.
Navigation, Clinic, and Access

- Basic View: The currently selected tab.
- Advanced View: See eServices Signup Advanced.
- Clinic: Only displays when Clinics is enabled. Select the clinic to view or edit currently signed up services. Each clinic can sign up for different services.
- Permission Level: The security permission level of the logged-on user. Users with the Security Admin permission can change eService settings. Users without this permission have read-only access.
Texting and Mobile Settings
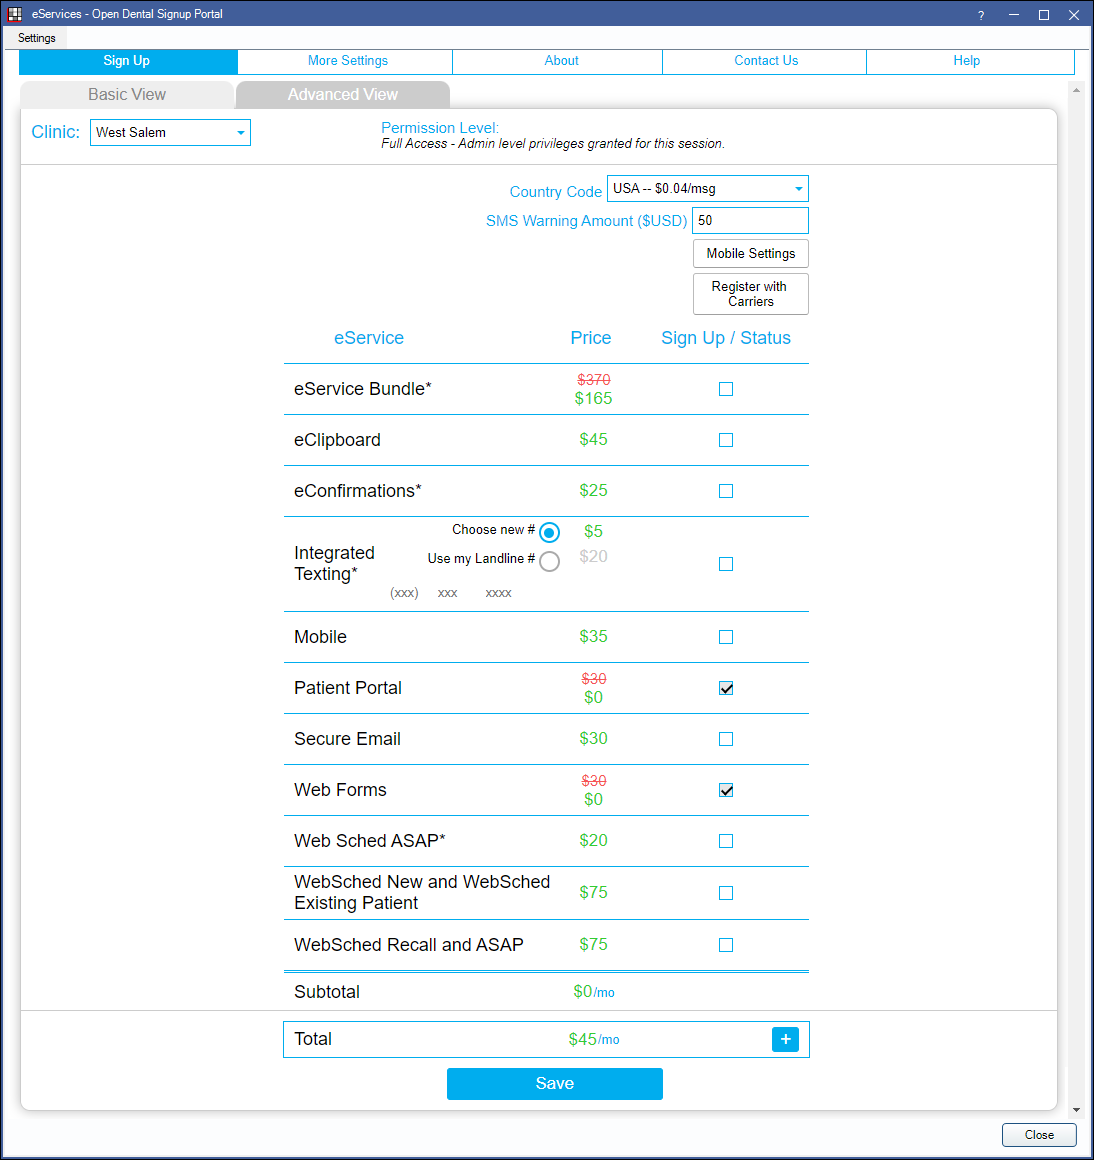
- Country Code: Used for Texting. Determines texting phone number and per message fees. Select the country the practice is in. If the needed country is not listed, contact Royal dental Software Support to see if the service is available.
- SMS Warning Amount: Applies to Integrated Texting. Enter the amount to spend on outgoing text messages per month (in U.S. dollars, minimum $1.00). If the amount is reached, manual texts cannot be sent until the amount is increased or the new billing cycle begins. This amount is specific to the clinic selected. This amount does not apply to or stop automated messages.
- Save SMS Limit: This button only displays when the practice is no longer on support with Royal dental Software. Update the SMS Warning Amount, then click to save changes.

- Save SMS Limit: This button only displays when the practice is no longer on support with Royal dental Software. Update the SMS Warning Amount, then click to save changes.
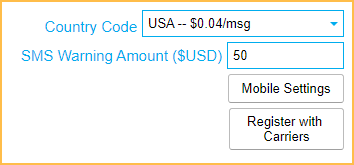
- Mobile Settings: Click to create login and registration details for use with the eClipboard and Royal dental Software mobile apps. Alternatively, create login credentials from Mobile Settings. If using Clinics, each clinic will have their own set of login credentials.
- User Name: Create a username for use with the mobile app.
- Password: Create a password for use with the mobile app. Requires 6 characters, 1 uppercase, 1 number, and 1 special character.
- Re-Enter Password: Confirm the password for use with the mobile app.
- Email Address: Register an email address for use in verifying identity and account recovery.
- Phone Number (Optional): Register a phone number for use in verifying identity.
- Register with Carriers: Required for all texting users. See Register with Carriers.
- Practices must complete registration before making any changes in the Signup Portal. For those using clinics, this includes signing up new clinics. Once registration is complete, changes can be made again.
- If registration was completed, but the information entered could not be verified, the button will turn red. Users must verify and submit registration again.

- If registration was completed, and the information entered was successfully verified, a green checkmark will display and the button text will update. This confirms registration is complete.

eServices Signup Grid
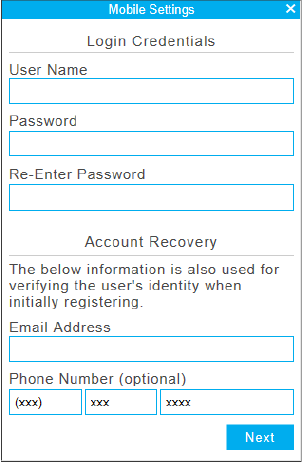
The signup grid displays each service and whether the practice/clinic is currently signed up.
- The Price column lists the per location monthly fee for the eService.
- Hover over a service to view information, eService terms, and in some cases the Hosted URL.
- The Sign Up / Status column indicates whether the eService is currently active, pending stop, or inactive. Click in a box to change its status.
- Checked: eService is currently active. Patient Portal and Web Forms are free for those on support thus they are always active.
- Unchecked: The eService is not active. Click the Info button in the upper right to view the Next Bill Date.

- Total: As eServices are selected, the total $ amount will update to reflect new charges. Click + to expand the total to list fees for each clinic.
- Save: Apply eService changes. Charges will be reflected in the practice's next statement.
Integrated Texting Options
There are two options available when signing up for integrated texting service.
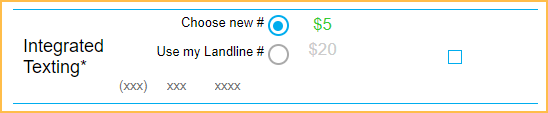
- Choose New #: Select this option to have a new number automatically assigned to the office for use with Integrated Texting.
- Offices in the United States and Canada have the additional option of requesting a local number. Click into the phone number field and the window below will appear.
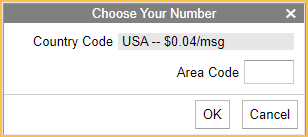
- Enter the area code and click OK. This option is only available in the Basic View of the Signup Portal. Complete the signup process by making sure a monthly texting limit is entered above, and click the Save button at the bottom.
- Offices in the United States and Canada have the additional option of requesting a local number. Click into the phone number field and the window below will appear.
- Use my Landline #: Select this option to sign up for the Integrated Texting service with the existing landline phone number. This is limited to Royal dental Software clients located in the United States and Canada.
- The increased price for using a landline number for Integrated Texting or eConfirmations will display in green. The eService Bundle price remains the same.
- Click into the phone number field to enter the number.
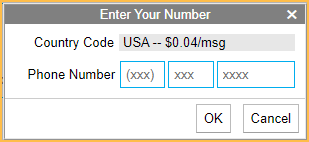
- Enter the current practice landline phone number and click OK. The number will be subject to an eligibility check and a verification process to ensure the number entered belongs to the practice.
Note:
Regarding the Use my Landline # selection:
- Customers using VOIP numbers may experience a delay in service and should work directly with Royal dental Software support. Please complete and return this Letter of Authorization to eServices@royaldental.com.
- Only United States and Canadian numbers will work with this option. Mobile and some VOIP numbers are not supported.
- In rare cases, your telecomm provider may not support landline texting. Additionally, your telecomm provider may change suppliers at some time after you have signed up. This may result in your number no longer being available for this service, as not all suppliers support landline texting. In cases like these we can provide your practice with an alternate number utilizing a local area code.