

eClipboard: What Patient Sees
On an Android or iOS tablet, launch the eClipboard app.
- To use eClipboard, you must Signup for the service and enable your preferred eClipboard Settings.
 See our video: eClipboard Webinar.
Additional features can be used with eClipboard. Also see:
Patient Check-in
The check-in process varies depending on selected settings and forms.
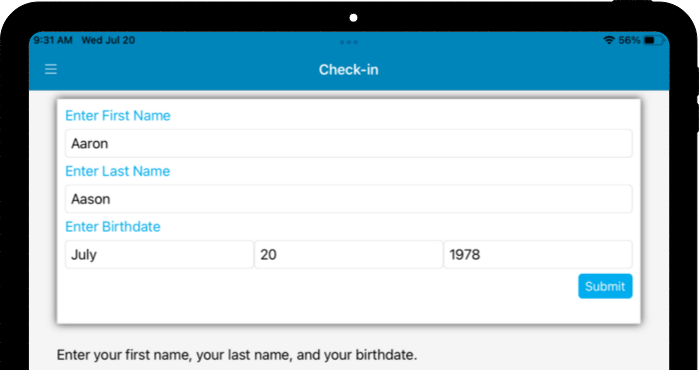
If Allow self check-in is enabled, patients will start by entering their first name, last name, and birthdate. Preferred names will be taken into consideration if they are entered in the Edit Patient Information window.
- Alternatively, when Display check-in questions individually is checked, the first name, last name, and birthdate prompts each appear on their own screen.
Once entered, the patient will be asked to confirm the time of their appointment and provider.
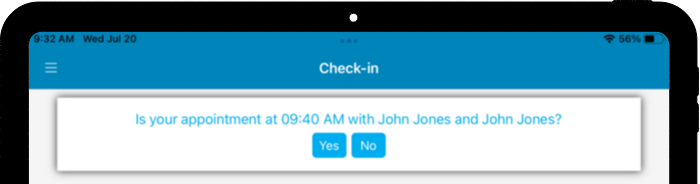
- The provider's preferred name will be used if entered in the Edit Provider window.
- A warning will prompt the patient if the clinic assigned to the device differs from the clinic the patient is scheduled in.
Patient Authentication
If Require patients to complete authentication before showing sheets is enabled, the patient will be prompted to enter a code to verify their identity.
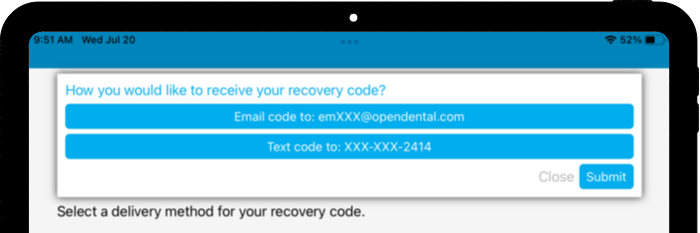
The patient will select their preferred way to receive the authentication code:
- Email code to: Email the code to the email address on file for the patient.
- Text code to: Text the code to the wireless phone number on file for the patient.
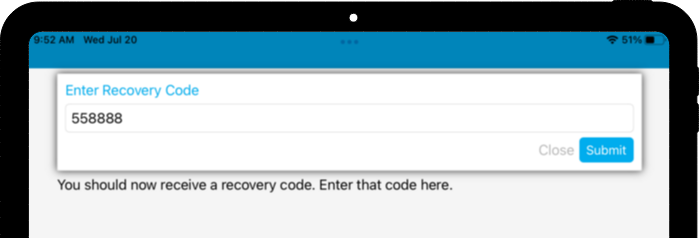
Once the code is received, the patient will be prompted to enter it. Enter the code, then click Submit to continue.
Check-in Checklist
Once at the Check-in Checklist, the patient can begin completing items. Items showing vary depending on eClipboard Settings selected. As items are completed, the red exclamation point turns to a green checkmark.
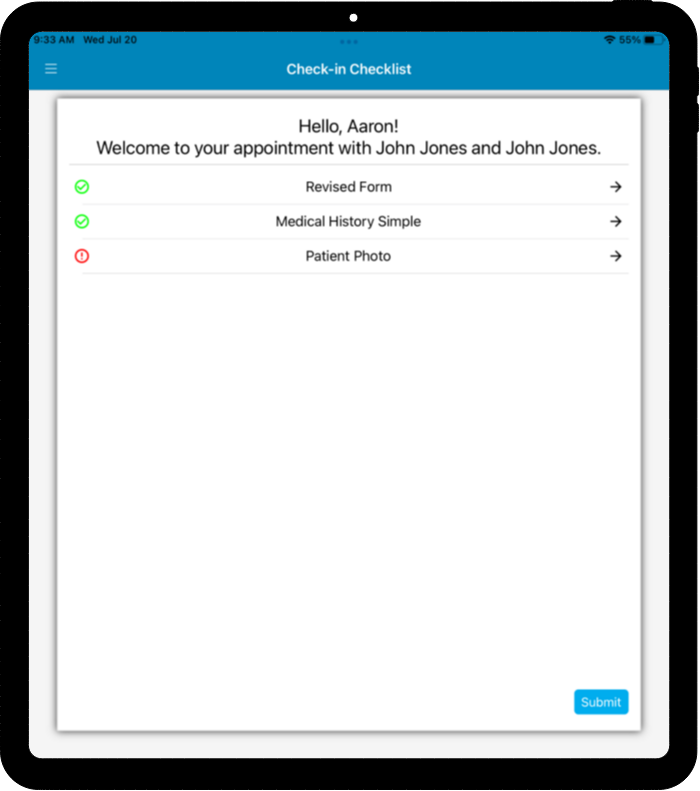
The patient will click on an item to complete it, then will be prompted to click Next to move on to the next item. Checklist items can include:
- Patient forms (Allow patients to fill forms in mobile app, Add specified forms upon patient arrival)
- Staff can also send or remove forms from the list from the Kiosk Manager. This can happen at any time in the eClipboard process as forms will upload to the device in real time.
- If manually checking in a patient, enable Show kiosk manager when staff changes patient status to arrive. This will prompt the Kiosk Manager to show and send the forms to a device.
- Forms use the mobile layout of custom sheets. Some fields may pre-fill with patient information. These fields can be edited or updated as needed. Once filled, patients can sign digitally using the touch screen of the device.
- First Name, Last Name, and birthdate cannot be edited.
- Patient picture (Allow patients to take self-portrait in mobile app)
- Even when enabled, patients may skip this step and submit forms anyway.
- Picture of their Photo ID (Allow Image Captures)
- Even when enabled, patients may skip this step and submit forms anyway.
- Picture of their Insurance Card (Allow Image Captures)
- Even when enabled, patients may skip this step and submit forms anyway.
Return Screen
Once all items are submitted, a message will show requesting the patient return the device. You may customize the message in your eClipboard setup, Message to show patients after successful check-in.
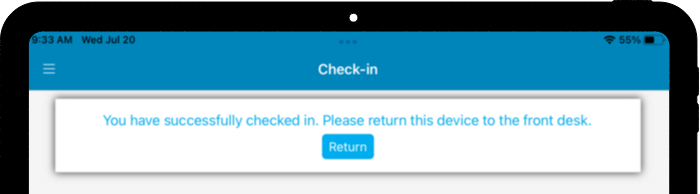
Click Return to return to the Check-In screen, or wait 20 seconds and the app will automatically refresh.
Signup Portal Login
To associate eClipboard with your practice, enter the Signup Portal Credentials. These credentials are only needed the first time you login to eClipboard, or if you have manually logged out of eClipboard.
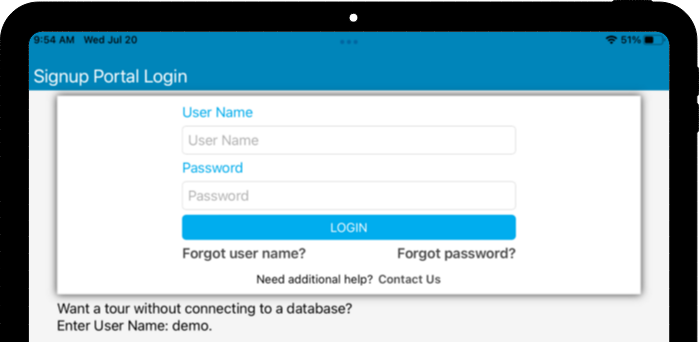
If using the same device between clinics, completely log out, then log in using the credentials for the needed clinic.
Menu
Click the menu icon in the upper left to open the menu.
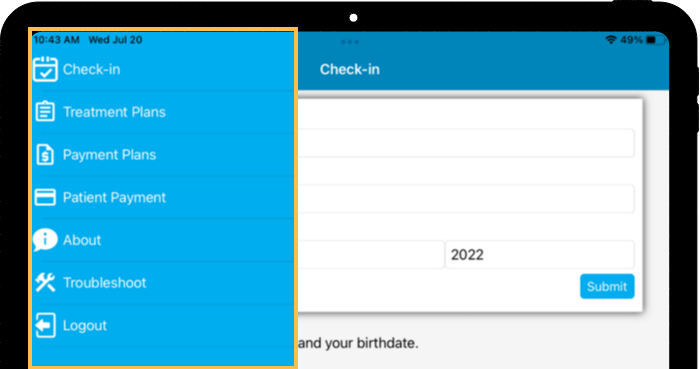
- Check-in: Opens the patient Check-in screen.
- Treatment Plans: Opens the camera to scan a Treatment Plan QR code. See eClipboard: Treatment Plan.
- Payment Plans: Opens the camera to scan a Payment Plan QR code. See eClipboard: Payment Plans.
- Patient Payments: Opens the camera to scan a Patient Payment QR code. See eClipboard: Payment.
- About: Opens the About section. See below for details.
- Logout: Close eClipboard. User will be prompted to enter their Royal dental Software credentials. This is to prevent patients from accessing other areas of the device.
About
Use the eClipboard Menu to view About information. The user will be required to enter their Royal dental Software credentials before information will display.
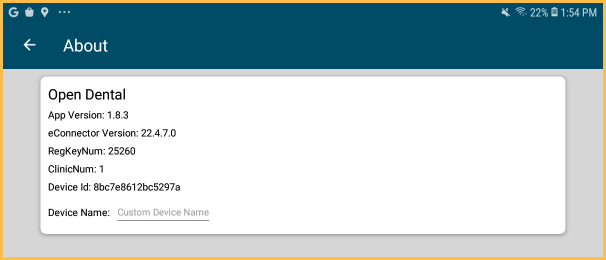
Device Name: The default name can be customized as needed to differentiate devices.