

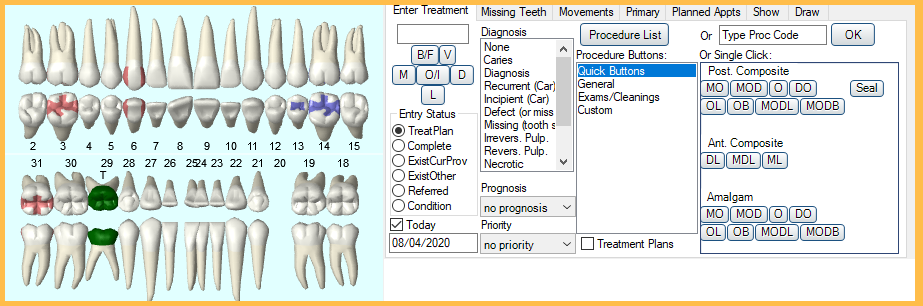
Enter Treatment
In the Chart Module, select the Enter Treatment tab.
You can chart planned treatment, treatment that will be referred out, or existing treatment (done at your office or another location). Entered treatment will show on the Graphical Tooth Chart and will list in the Progress Notes.
![]() See our video: Clinical Charting 1: Entering Treatment Webinar.
See our video: Clinical Charting 1: Entering Treatment Webinar.
Tooth Surface Buttons (B/F, V, M, O/I, D, L): Click on a button to populate the surface in the box above. To remove an entry, click the button again. The box itself cannot be edited.
- Royal dental Software uses V to indicate a class 5 location along the gingival margin of the B or F.
- The V surface will draw separately on the tooth chart. There is no corresponding lingual class 5 indicator.
- V is not one of the surfaces allowed when submitting to insurance, so it will convert to B or F on all claims.
- V is also not counted as a surface for auto codes.
- Do not count a V as another surface additionally to B or F because no line angles were crossed. For example, you might have a 2 surface DBV, which would be automatically converted to a DB on outgoing claims.
- Surfaces are handled slightly differently in Canada
Entry Status: Determines the procedure status. Set status colors in Definitions: Chart Graphic Colors.
- TreatPlan (default): For treatment that is recommended, but not yet complete. Procedure(s) will have an entry date and a fee. If added to the active treatment plan, the status will be TP. If added to inactive plans only, the status will be TPi. If no treatment plan is selected, the procedures are added to the active plan.
- Complete: For work that you have already completed. Procedure(s) will have a fee.
- ExistCurProv: For treatment that was done in your practice prior to using Royal dental Software. Procedure(s) will have no fee.
- ExistOther: For treatment that was done by another provider, either before the patient came to your practice, or because they were referred out for treatment. Procedure(s) will have no date and no fee.
- Referred: For treatment the patient needs, but will be done at another office. Once the work has been completed, change the procedure status to EO. Referred procedures usually have the date of the referral, but no fee.
- Condition: For charting conditions or watches. See below.
Date/Today: The procedure's entry date. Check Today to insert today's date. To enter multiple procedures with a previous date, uncheck the today box, then enter the date first, before entering treatment. This date populates on treatment planned and completed procedures, unless the procedures are attached to an appointment, in which case the appointment date is used.
Diagnosis (optional): One diagnosis can be set per procedure. Diagnoses do not show on the graphical tooth chart. Customize options in Definitions: Diagnosis Types. To see diagnoses separately from the proposed treatment, use the Condition (Cn) entry status.
Prognosis (optional): Customize options in Definitions: Prognosis.
Priority (optional): Used to prioritize treatment planned procedures. Customize options in Definitions: Treat' Plan Priorities.
Procedure List: Select a code from the Procedure Codes.
Procedure Buttons: These buttons are associated with multiple codes or Auto Codes and organized by category. see Procedure Buttons.
Type Proc Code: Manually type the code then click OK. If a D code, entry of the D is optional.If the procedure requires a tooth surface, you can click surface buttons before clicking a button or entering the code, or you will be prompted to enter surfaces after.
Quick Buttons: These buttons are associated with a single code and designed to quickly chart fillings and sealants.
Treatment Plans: Check this box to show treatment plan information in place of the Progress Notes. See Treatment Plan in Chart. This check box only shows when Is TP View is also selected for the Chart View on the Show tab (Show Chart Views).
Entering Treatment
Entering by treatment area:
- When entering a procedure code for one tooth, select the tooth from the graphics. Select multiple teeth if entering the same procedure for each tooth.
- When entering a procedure for a tooth range, select the range of teeth from the graphic. The selected procedure code will automatically enter the teeth into the treatment area.
- When entering a procedure for a quadrant, select any tooth in that quadrant. When entering a procedure for an arch, select any tooth in that arch. The charted procedure will then automatically enter the correct treatment area.
By default, procedures will chart with a status of Treatment Planned. Double-click a procedure to manually change the procedure status.
Treatment Planned procedures will default to the provider for the patient's first appointment of the day, if it exists.
The procedure will list in the Progress Notes and show on the tooth chart (if applicable). If information is missing, the Procedure will open so you can fill it in. Double-click a procedure to edit it.
Conditions and Diagnoses: There are two possible workflow options for charting diagnoses (e.g., caries).
- Mark the diagnosis on the procedure that is being treatment planned.
- Set the Entry Status to TreatPlan (or Referred if the treatment is not being done in office).
- Select a diagnosis from the list.
- Select teeth or treatment area as needed.
- Chart the procedure code. The diagnosis is now attached to the charted treatment. If the diagnosis needs to be changed or was not attached at the time the treatment was charted, double-click the procedure to open the Procedure Edit window. A diagnosis can also be attached here.
- Enter all the diagnoses as conditions, separate from any planned restorations.
- Set the Entry Status to Condition.
- Select a diagnosis from the list.
- Chart a watch procedure (e.g., N1254, N1255).
Change Code Recommendations
If using Auto Codes, you may receive a prompt to change a procedure code if Royal dental Software has recognized a mismatch.
To set whether or not staff is required to accept auto code suggestions, see Preferences, Require use of suggested auto codes.