

Auto Codes
Auto codes work behind the scenes to insert and validate the correct procedure code depending on a variety of tooth conditions.
In the Main Menu, click Setup, Auto Codes.

Auto codes can be associated with Procedure Buttons. Royal dental Software comes preloaded with many auto codes, but you may want to add more.
Examples:
- When you select a primary tooth, two surfaces, then click the Amalgam procedure button, the auto code will insert the correct procedure code.
- While Enter Treatment, if you select three surfaces for a two surface procedure code, Royal dental Software will recognize the mismatch and prompt you to change to the recommended three surface procedure code. To require that staff accept auto code suggestions, enable the Require use of suggested auto codes preference.
To reset auto codes to the default settings, see Procedure Code Tools.
![]() See our video: Procedure Buttons, Quick Buttons, and Auto Codes Webinar.
See our video: Procedure Buttons, Quick Buttons, and Auto Codes Webinar.
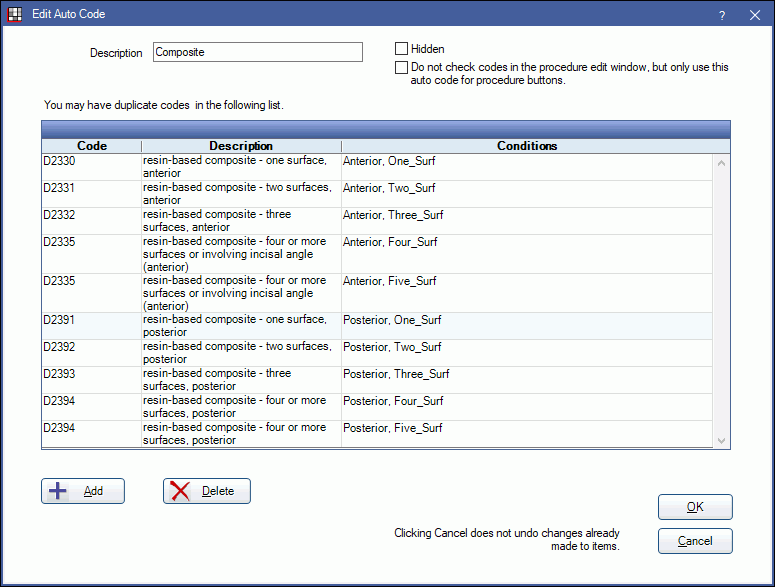
Add or Edit Auto Codes
Click Add, or double-click an auto code to edit. All procedure codes associated with the auto code will list.
Options:
- Description: View or edit the description of the auto code.
- Hidden: when checked, this auto code will not be available for selection on the Edit Procedure Button window.
- Do not check codes in the procedure edit window, but only use this auto code for procedure buttons: If checked, this auto code will only be used when entering treatment using a Procedure Button. It will not be used for validating procedure codes entered on the Procedure edit window. Thus, the validation message usually triggered when an entered procedure does not match the entered procedure code will no longer popup. To restart the validation message, uncheck this box.
Add: Click to add an additional procedure code and conditions to the auto code. The following window will open: 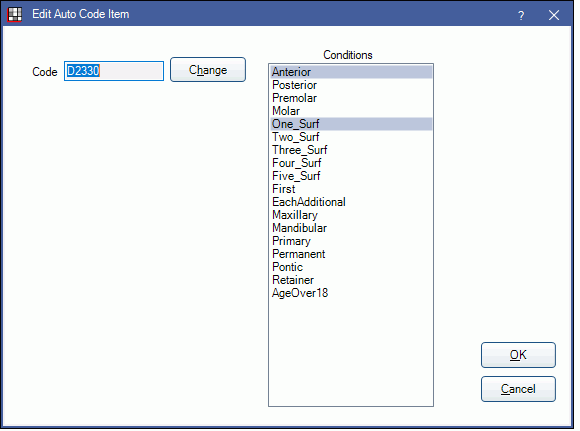
- Code: Click Change to select the procedure code.
- Conditions: All possible conditions must be defined for the auto code to work correctly. Highlight the conditions that will trigger this procedure code, then click OK to save.
Delete: Highlight a code, then click to delete it from the auto code.
Click OK to save changes.
Tips
When selecting conditions, there are some logical groupings. You should never select two conditions from the same group since both conditions can not possibly be met simultaneously.
- Anterior and Posterior are opposites.
- Anterior is also part of the Molar/Premolar group.
- The five surfaces are a group.
- First is the opposite of EachAdditional.
- Maxillary is the opposite of Mandibular.
- Primary is the opposite of Permanent.
- Pontic is the opposite of Retainer.
- The AgeOver18 condition is non-functional and should not be used.
Most of the conditions are simply based on tooth number.
- For instance, for tooth number 5, the Anterior condition is false, the Posterior condition is true, and the Premolar condition is true.
- First and Each Additional really only apply if you have selected multiple teeth on the chart and click a procedure button, perhaps for a PA. The first one meets the First condition, and the remaining will be Each Additional.
- Pontic and Retainer are also unusual. A tooth is considered missing if it has been marked as missing in the Chart Module (an extraction or using Missing/Primary Teeth), this includes a tooth where an implant may be placed. So the Pontic condition is met if the tooth is missing, and the Retainer condition is met if the tooth is not missing.