

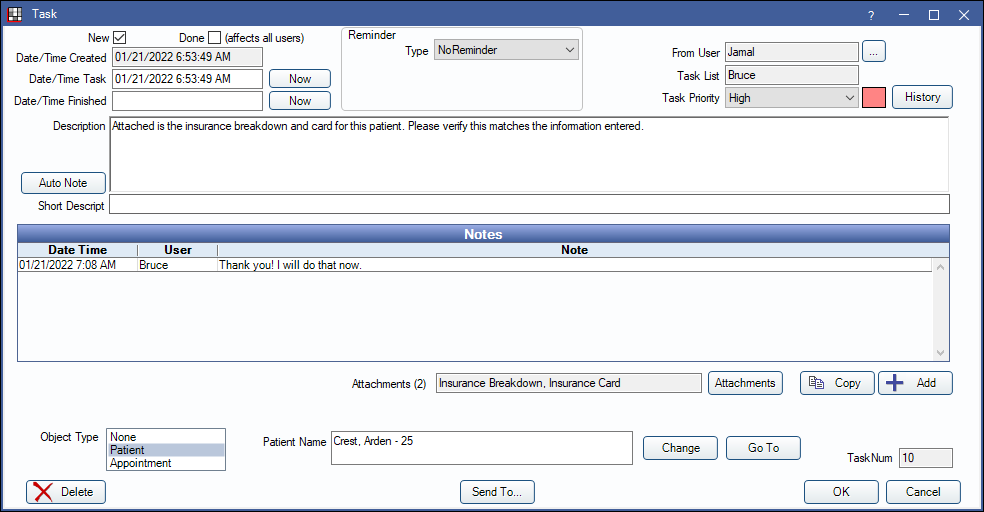
Task Window
The Task window opens when a task is created or task response is received, or double-clicking an existing task from a task list.
In the Main Toolbar, click the Task dropdown, For user. In the Tasks window, click Add Task.
New: The read status of a task. All tasks start out marked New, are prioritized at the top of the task list, and appear in the New For tab. The task list icon in the Tasks window will turn orange to indicate new/unread tasks. To mark a task as read, uncheck New or right-click from the task list and Mark as Read. The task will be removed from the New For tab and prioritized by date/time and Task Priority in the task list. Read tasks can be marked as New at anytime. Checking New only marks the task new for the user, not all users subscribed to the task list.
Done: Complete and close a task. Check Done to close the task and hide it from the task list. Also right-click from the task list and select Done. To close a task attached to a patient, right-click the task in the Chart Module progress notes and Set Complete. The task will show as complete in the progress notes. Chart module completed task background and text colors can be changed in Definitions: Prog Note Colors.
To view completed tasks, from the Tasks window, click Options, and check Show Finished Tasks. Or double-click a task from a patient's chart and uncheck Done. Editing or sending a completed task to another task list automatically removes the Done status.
Date/Time Created: Auto-populates with the date and time the task is created. For security purposes, this cannot be edited.
Date/Time Task: Typically the same as Date/Time Created. Click Now to enter the current date/time or manually edit to a specific date/time. This field affects the order of the task in the task list.
Date/Time Finished: Auto-populates with the date and time the task was marked done or set complete. Click Now to enter the current/date time (does not mark done).
Reminder: Set the task to pop up or appear new in the task list for a specific date and time. If the Reminder state is anything other than NoReminder, additional fields will appear below. See Task Reminder.
From User: Displays the user that created the task. To change the user, click [...] and select a new user from the list. The user can only be changed once the task is saved (e.g., Create the task, click OK, then return to the task to change the user). If changed, the original user will no longer be able to see edits to the task unless the user is subscribed to the task list the task is sent to.
Task List: Auto-populates with the name of the task list the task is currently in or being sent to. To change, click Send To (see below).
Task Priority: Assign a priority to the task. Tasks are sorted by the New status, Task Priority, then date and time. Add or edit priority types in Definitions: Task Priorities.
Description: Type the task description. This text box supports Right Click Text Box options. To change the height of the description box, drag the splitter bar between the Description text box and Notes grid and drag to the desired height.
- Add Wiki links to a task so users can right-click the task and go directly to the wiki page. To add a link, enter the wiki page title surrounded by double brackets (i:e. [[wiki page title]]).
- Use Quick Paste Notes to quickly add frequently used notes. Enter the quick note shortcut or right-click and select Insert Quick Note. The quick note must be in a quick note category assigned to tasks to work.
- Add web URLs to a task so users can right-click the task and go directly to the web page. To add a URL, copy and paste into the task description.
Edit Auto Note: Click to resume filling out a previously started Auto Note.
Auto Note: Insert an Auto Note template to the task description.
Short Descript: Type a brief description of the task. This is what will show in the task list. Users then double-click to view the entire task.
Notes: Comments and notes added by users. Double-click into a note to make changes. User must have Task Note Edit security permissions.
- Date Time: The date and time a user added a note.
- User: Name of the user that added a note.
- Note: Note text added by the user.
Add: Opens the Task Note Edit window to add comments and notes to the task.
- Date/Time: Auto-populates with the date and time the note is created.
- User: Name of the user adding the note.
- Note: Additional task comments or notes. Also support wiki links, quick notes, web URLs, and auto notes.
- Delete: Removes entire note from task.
- OK: Saves the note.
- Cancel: Exits the Task Note Edit window without saving changes.
Attachments: Displays attachments added to the task (if any). The number in parenthesis updates with the number of attachments added. Click Attachments to view a list of attachments or add a new one. See Task Attachments.
Copy: Copies the task number, date/time stamps, patient name and appointment date/time (if attached), task description, notes, and associated users to the clipboard.
Object Type: Attach a task to an appointment or patient. Attached patient related tasks to an appointment or patient to quickly access the patient or jump to the appointment.
- None: Task is not attached to an appointment or patient and the task cannot be sent to a task list with these object types. Tasks can still be sent to user inboxes. Tasks with object type None cannot be tracked in the New For or Open Tasks tabs.
- Patient: Task is attached to a patient and shows in the patient's progress notes and Patient Tasks tab. Patient name will show last name, preferred name (if entered), first name, and patnum.
- Appointment: Task is attached to an appointment.
Change: Change attached patient or appointment. Only available if the object type is set to Patient or Appointment. Click Change to open the Select Patient window and select a patient to attach (only one patient can be attached). When the object type is set to Appointment, Change opens the Select Patient window and when a patient is selected, the Patient Appointments window opens to select the patient's appointment to attach.
Go To: Exits the Task window and changes the currently selected patient to the patient attached to the task. When the object type is Appointment, the active modules changes to Appointments Module and jumps to the date of the appointment in the calendar.
TaskNum: Displays the internal number associated with the task. Useful when using Task Search.
Delete: Deletes the task and task notes. An audit trail entry will be created but the task cannot be retrieved once deleted.
History: Opens the Task History window shown below that displays a summary of task changes. Only available if the user has Security Permissions for TaskEdit .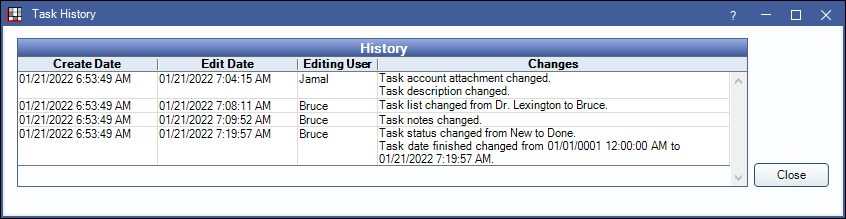
- Create Date: Original date of the task.
- Edit Date: Date the task was changed.
- Editing User: User who made the change.
- Changes: Description of the change.
Reply: Opens the Task Edit Note window to add a note. Click OK to immediately send the task with the reply back to the inbox of the last user that added a note or the original creator of the task if no notes have been added.
Send To: Moves the task to the selected task list. Click to open the Select Task List window. Task lists with the same Object Type as the task will show. Type the task list name in the Search field or select from the available task lists then double-click or click OK to move the task.
OK: Exits the Task window and saves changes.
Cancel: Exits the Task window without saving changes to the task information (e.g., description). If notes or attachments were added to an existing task, these will be saved.