

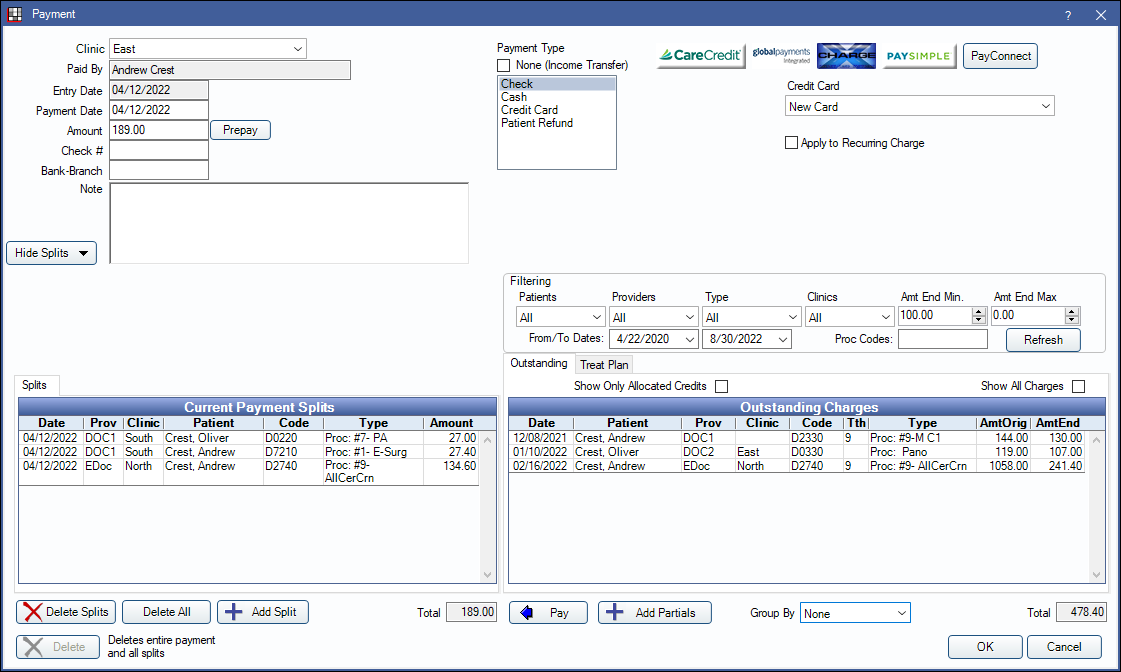
Payment
Use the Payment window to make patient payments or refunds, or view payment split information.
In the Account Module, click Payment.
Enter a patient payment or process a Patient Refund. By default, payments are automatically allocated via Payment Splits (paysplits) to the oldest adjustments, pay plan charges, and procedures with a remaining balance. If the production charges are paid in full, expected to be paid in full, or the patient has a credit balance, payments are allocated to unearned income (e.g. prepayment). To change payment allocation settings, see Allocations Setup.
![]() See our video: Entering Patient Payments Webinar
See our video: Entering Patient Payments Webinar
Creating a Payment
To enter a payment:
- Select the charges (adjustments, pay plan debits, procedures) from the patient ledger, then click Payment.
Alternatively, just click Payment.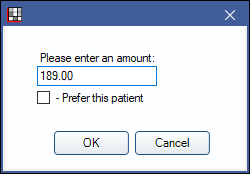
- Enter the payment amount.
Check Prefer this patient to apply the payment to the patient's oldest outstanding charges. Or, leave unchecked to apply the payment to the oldest outstanding charges for the whole family. - Click OK to open the payment window and enter the payment details. Note: When charges are selected, the payment amount is split between the charges by their remaining patient portion due.
- Any charges with no balance due, are skipped, and the payment is automatically split to the next oldest outstanding charge.
- If a selected charge was previously overpaid, the overpaid amount is deducted from the charge and re-allocated to another charge within the current payment.
- (Optional) To allocate the payment towards treatment planned procedures, click Delete All to remove the current payment splits.
- Click the Treat Plan tab and select the procedures.
- Click Pay and OK to finalize the payment. Note:
- Payments allocated to procedures for multiple family members will post to each patient account and include the name of the paid by account. The paid by account will also have a zero line item to show a payment from this account is split to another account.
- Payments allocated to treatment planned procedures do not show on the patient account, but instead, show under the Hidden Splits tab.
Payment Details
Clinic: The default clinic is determined by the Payments Use Patient: Clinic preference. Click the dropdown to select a different clinic. Clinic specified will determine which payment processor credentials are used for merchant services if defined per Clinic. If using Deposits, this is the clinic the payment is associated with.
Paid By: The name of the patient making the payment. When a payment is split to multiple family members, the payment description will show the paid by name.
Entry Date: The date the payment is entered. This is system-generated based on when the payment was created and cannot be changed.
Payment Date: The date the payment is received. It will be used on Deposit Slips.
Amount: The payment amount. This amount must match the total Current Payment Splits amount (see below).
Prepay: Click to delete existing paysplits and replace with a single paysplit using the Default unearned type for unallocated paysplits. See Unearned / Prepayment. The payment window will immediately close after clicking this button.
Check #: Optional, but recommended. Enter the check number associated with the payment. This can help distinguish one check payment from another on reports.
Bank-Branch: Optional. Enter the Bank-Branch associated with the check. This can help differentiate check payments with the same check number or same payment amount.
Note: A note is automatically added after processing a credit card payment, with the Credit Card Transaction Details. Optionally, add a note that appears in the patient's account as the payment description with the payment type. Notes will show on statements when the Show notes for payments preference is enabled.
Hide Splits/Show Splits: Click to toggle between payment split views. The default view is determined by the Allocations Setup preference, Hide paysplits from payment window by default. See Current Paysplits and Outstanding Charges sections below for more information.
Payment Type
None (Income Transfer): When checked, the Pay button changes to Transfer and the Outstanding Charges grid groups by patient, clinic, and provider. These options are useful to transfer income. See Income Transfer.
Payment Type: The type of payment. Customize options in Definitions: Payment Types. Whether or not a type is selected by default is determined by the Payments prompt for Payment Type preference. For transactions processed through an integrated credit card program, the payment type defaults to the type selected in the Credit Card Payment program link.
Pay Into Account: If using the Accounting feature, and auto payment entries are setup for the selected payment type, use the dropdown to select an asset account to debit or credit the payment to. See Accounting Setup.
Credit Card
See Credit Card Payment.
Recurring Charge
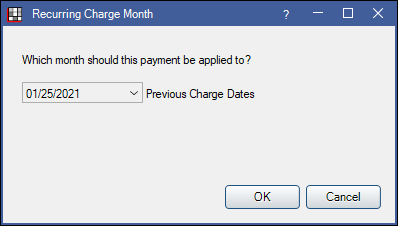
Apply to Recurring Charge: Check to apply this payment to scheduled CC Recurring Charges. If more than one recurring charge is scheduled for a month, the window below will display. Select the desired recurring charge date from the drop down list. Patient will be removed from the Recurring Charges List for the date the payment was applied.
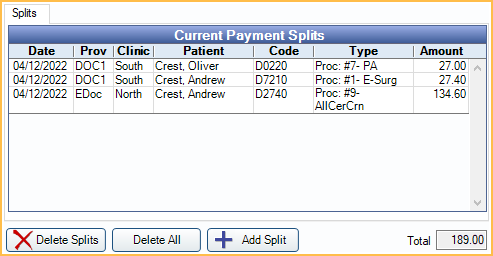
Current Payment Splits
This area lists this payment's current Payment Splits (paysplits) allocated to providers, clinics, patient, procedure, adjustments, pay plan charges, etc. It also lists unallocated paysplits (Unearned / Prepayment). Double-click a row to edit, see Paysplit Revise.
Delete Splits: Delete the selected paysplits from the grid. The total amount of the deleted split is added back to the Amt End under Outstanding Charges for future splits.
Delete All: Delete all the paysplits in the grid. All paysplit amounts are added back to the Amt End under Outstanding Charges for future splits.
Add Split: Manually add a paysplit.
Total: The sum of all current payment splits. The Total must match the total payment Amount in order to save the payment.
- If a payment is split to multiple providers, only the provider most recently added to the Providers list will be shown in the Patient Account Grid. Double-click an existing payment to see a breakdown of all providers attached to a payment.
- Payments split to multiple patients (e.g., family members) display text noting the first name of the Paid By account (i.e., where the payment was created) and (split) if the payment is split to multiple patients (e.g., Paid by Oliver (split)). Payment line items only display for accounts that have Payment Splits, regardless of the Paid By account.
Filtering

To change what shows in the Outstanding Charges grid (see below), use the Filtering options.
Show Only Allocated Credits: Only show production items with a remaining balance after their attached adjustments and payments have been applied. This may be useful if an outstanding charge is not listed because it has been indirectly paid off by unallocated credits.
Show Super Family Charges: Show or hide charges for every patient in the Super Family.
Show All Charges: By default, only unpaid adjustments, pay plan charges, and procedures in the family show. Check this box to also show paid charges.
Patients: Use the dropdown menu to view charges for a specific family member. Ctrl + click to highlight more than one family member.
Providers: Use the dropdown menu to view charges for a specific provider. Ctrl + click to highlight more than one provider.
Type: Use the dropdown menu to view specific charge types (e.g. adjustments, procedures, or pay plan charges).
Clinics: Use the dropdown menu to view charges for a specific clinic. Ctrl + click to highlight more than one clinic.
Amt End Min: Enter a value to limit the charges with a minimum remaining balance greater than or equal to this amount.
Amt End Max: Enter a value to limit the charges with a maximum remaining balance less than or equal to this amount.
From/To Dates: Enter a value or use the calendar dropdown to select a date range. Only procedures completed or treatment planned/scheduled in this date range will show.
Proc Codes: Narrow the charges by procedure code(s). This field is case sensitive. To enter more than one code, separate each code with a comma (e.g. D0210,D1110).
Refresh: Updates the grid when filtering options are changed.
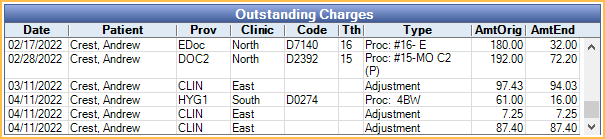
Outstanding Charges
This grid will list outstanding charges matching the filter criteria. Users can select charges or treatment planned procedures to create paysplits.
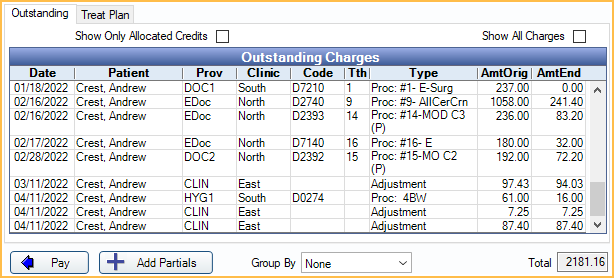
Outstanding Tab: Lists all adjustments, pay plan charges, and completed procedures that meet the filter criteria.
- Amt Orig: Amount owed on a charge prior to any payments, adjustments, or insurance estimates.
- Amt End: Amount owed on a charge after all payments, adjustments, and insurance estimates including the current payment.
- Total: The total amount of all the selected outstanding charges.
Treat Plan Tab: Lists all treatment planned procedures that meet the filter criteria. To show this tab, Allow prepayments to allocate to treatment planned procedures must be checked in Allocations Setup.
- Amt Orig: Amount owed on a charge prior to any payments, adjustments, or insurance estimates.
- Amt End: Amount owed on a charge after all payments, adjustments, and insurance estimates including the current payment.
- Total: The total amount of all the selected treatment planned procedures.
Pay: Click to create paysplits for the selected outstanding charges or treatment planned procedures.
Transfer: When None (Income Transfer) is the payment type, the Pay button changes to Transfer. Useful for Income Transfers.
Add Partials: Click to create a paysplit for only part of an outstanding charge. Users will be prompted to enter the partial paysplit amount upon clicking this button.
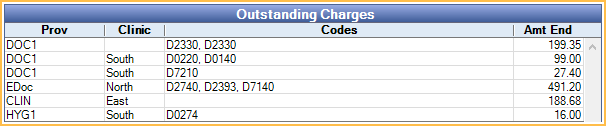
Group By: Change the grouping of items in the grid.
- None (default): Show all charges for all patients in the family, sorted first by date (oldest charge at the top), then by procedure code.
- Provider: Combine each family member's outstanding charges into one row per provider. When grouping by provider, the Type and Clinics filters are disabled.

- Clinic and Provider: Combine each family member's charges into one row per provider and clinic. When grouping by clinic, the Type filter is disabled.
Buttons at Bottom
Print Receipt: Reprint XCharge or PayConnect receipts. This button only shows if a receipt already exists for the transaction.
Email Receipt: Generate a PDF copy of the XCharge or PayConnect receipt and email it to the patient. A copy of the receipt is saved in the patient's Imaging Module.
Delete: Delete the entire payment. Only enabled on existing payments.
OK: Post the payment to the patient account.
Cancel: The behavior of the cancel button varies depending on the point you are at in the payment process.
- New payment no credit card transaction: If this is a new payment and no credit card has been processed, cancel deletes the payment.
- New payment with a credit card transaction: If this is a new payment and you just processed a credit card, cancel voids the credit card transaction, posts the payment, and posts a separate voided payment.
- Editing an existing payment: Cancels any changes made in the payment window.