

Lab Case
In the Chart Module toolbar, click LabCase.
Alternatively:
- In the Edit Appointment or Edit Planned Appointment Window, click Lab in the left panel, then New.
- In the Treatment Plan Module toolbar, click LabCase.
![]() See our video: Lab Cases.
See our video: Lab Cases.
Before creating a lab case, set up dental Laboratories.
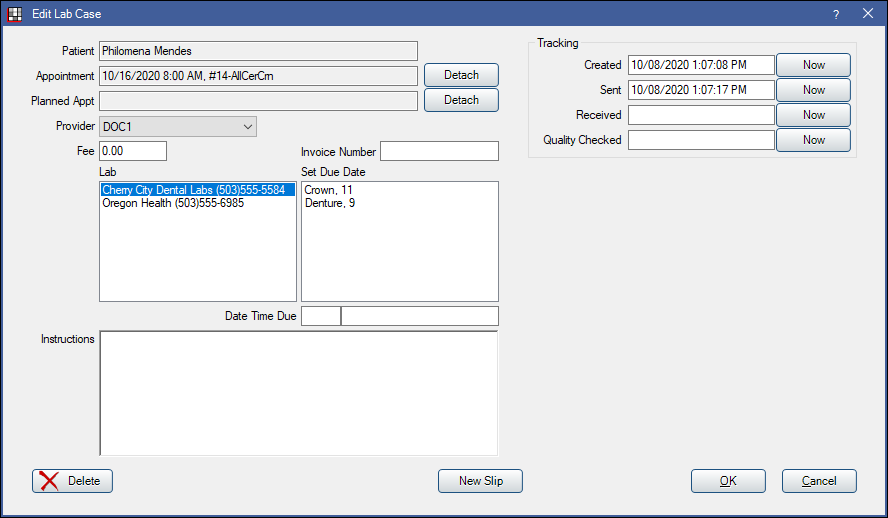
- Patient: Patient associated with lab case.
- Appointment: The scheduled appointment this lab case is attached to. Click Detach to remove the association with the appointment without deleting the lab case.
- Planned Appt: The Planned Appointment this lab case is attached to. Click Detach to remove the association with the appointment without deleting the lab case.
- Provider: Provider associated to lab case.
- Fee: For tracking and informational purposes only. The fee is not used in any calculation.
- Invoice Number: Add an optional invoice number. For tracking and informational purposes only.
- Lab: A list of labs added in Laboratory Setup. The lab's available services and turnaround times (as set in Laboratory Setup) will list under Set Due Date
- Set Due Date: A list of services and turnaround times defined in Laboratory Setup for the selected lab. The turnaround time is used to calculate a Date Time Due. After a user clicks the turnaround time, it will not stay highlighted. Click on a service/turnaround time to automatically calculate a Date Time Due, skipping weekends and holidays (as set in Schedules). It is assumed that holidays are days that both the practice and labs will be closed. Provider schedule is not taken into account. Note that selecting a service does not track the kind of lab case, it only generates the due date. Dates can also be edited as needed.
- Date Time Due: If a user clicks a service/turnaround time listed under Set Due Date, the Date Time Due will automatically calculate. Users can also edit as needed. If left blank, the date time due of 01/01/0001 12:00 AM will automatically be inserted when lab slips or sheets are generated.
- Instructions: Instructions that will show on the generated lab slip. Right-click to insert a quicknote or auto note.
- Tracking Dates: Used to track the progress of the lab case. Click Now to insert the current date and time. This is useful for managing Lab Cases.
- Created: When the lab case was created.
- Sent: When the case was finished being packaged and set out to be picked up. It may not actually be picked up until hours later.
- Received: When the lab case was processed by the office staff as having come back from the lab. The box does not need to be opened.
- Quality Checked: The box has been opened. The case appears to be ready to deliver to the patient. The staff has performed whatever quality checks are needed, including checking contacts, appearance, etc.
New Slip / Edit Slip: Generate a new Lab Slip, or edit a lab slip for an existing lab case. Set default lab slips for each lab in Laboratory Setup.
Delete: Click to delete the lab case. To instead detach the lab case from the appointment, see Appointment and Planned Appt above. If a lab slip has been created, the following error message will appear when attempting to delete the lab case:
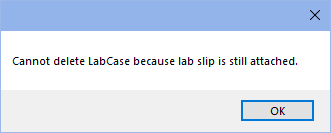
To delete a Lab Case with a lab slip attached, the lab slip must first be deleted. Click Edit Slip to delete the attached lap slip.
Once a lab case is created, an entry will be added in the Progress Notes. If it was created within the Edit Appointment or Edit Planned Appointment window, the lab case will already be attached to the appointment and is ready to be scheduled. If created outside of an appointment, see Attach a Lab Case to an Appointment below.
If an Image Category has been assigned to LabCases, a PDF copy of a lab slip will be saved to the image module when printed, emailed, or created as a PDF.
Attaching a Lab Case to an Appointment
Lab cases should always be attached to an appointment. If an appointment is not yet scheduled, attach the lab case to a Planned Appointment. Generally, labs are attached to the delivery appointment (e.g., seat). If a lab case is not attached to a planned or scheduled appointment, it will be listed as unattached in the Lab Cases list.
To attach the lab case to a planned appointment, double-click the appointment in the Planned Appts tab to open the Edit Planned Appointment Window.
To attach to an already scheduled appointment, double-click the appointment itself in the Appointments module to open the Edit Appointment Window.
Alternatively, from the Appointments Module, click Pat Appts, and double-click a scheduled or planned appointment to open the Edit Appointment window.

Click Lab in the left panel, then select the lab case and click OK to attach it. To create a new lab case, click New.
A list of lab cases already created for this patient, but not attached to an appointment, will show.
The attached lab case information will show in the Lab field.
It will also show in the appointment itself if Lab is added to the appointment view (Appointment View Edit).
Related Link: Procedure over Multiple Appointments.