

DentalXChange Attachment
Attachments can be sent electronically through the DentalXChange (ClaimConnect) clearinghouse.
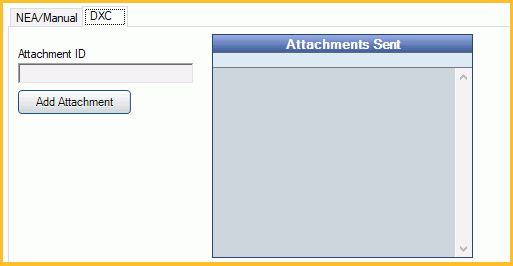
In the Edit Claim - Attachments Tab, click the DXC tab.
Enable the DentalXChange Attachment service in ClaimConnect E-Claims prior to sending attachments.
- Attachment ID: An attachment ID will automatically populate when attachments are sent. DentalXChange will use the attachment ID to associate attachments to the claim.
- Add Attachment: Click to add a new attachment.
- Attachments Sent: Lists attachments already sent.
Adding Attachments
Click Add Attachment to open the Claim Attachments window. A warning will pop up to ensure all changes to the claim have been saved first. The Edit Claim window will be closed.
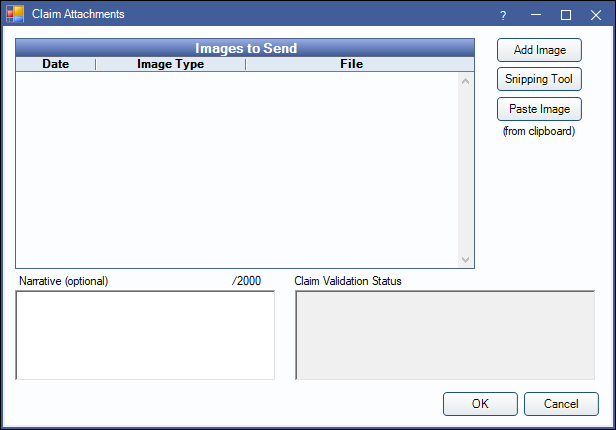
- Add Image: Attach and existing image from the File Explorer.
- Snipping Tool: Opens Windows Snip & Sketch to take a screenshot. The Image Info window will not automatically open when using the Snipping Tool. Instead, double-click the image from the list to add information.
- Paste Image: Paste an image currently copied to the clipboard.
- PDF files are not supported by the DentalXChange Attachment Service.
- If no Image Category is selected for Attachments, a warning will appear stating the first image category listed will be used.
- Users can add as many attachments as needed. If the service times out, attachments will be sent one at a time until all have been sent.
- Narrative: Enter a narrative (optional). Allows up to 2,000 characters.
- Claim Validation Status: Lists any errors or validation notes received from DentalXChange for the claim or attachments.
As each image is added, the following window will appear:
- File Name: Give the image a file name.
- Date Created: This field will auto-populate with today's date. Change the date if needed.
- Image Type: Select from:
- Referral Form
- Diagnostic Report
- Explanation of Benefits
- Other Attachments
- Periodontal Chart
- X-Rays
- Dental Models
- Radiology Reports
- Intra-Oral Photographs
- Narrative
Is xray mirror image: Determines the image orientation.
- Checked: The left side of the image corresponds with the patient's left side.
- Unchecked: The left side of the image corresponds with the patient's right side.
A preview of the image will display on the right.
OK (and Snip Another): Click to save image information and re-open the snipping tool to snip an additional image. This option will only appear if Snipping Tool was selected in the previous window.
OK: Click to save image information and return to the Claim Attachments window.
Cancel: Click to return to the Claim Attachments window without saving the current image.
Once attachments have been sent, return to the Edit Claim window and send the claim. If Save DXC Attachments to Images Module is checked in ClaimConnect Clearinghouse Setup, the attachment will be automatically saved to the patient's Imaging Module.
Resending a Claim
If a claim must be resent due to a missing attachment, do the following:
If insurance provided a reference ID number:
- Add the attachment to the original claim.
- In the Misc Tab of the claim, add the Original Reference Number.
- Change the Correction Type to Replacement.
- Resend the claim using the Resend button
- Select The claim was accepted and I need to replace it with updated information when prompted.
If insurance did not provide a reference ID number.
- Add the attachment to the original claim.
- Resend the claim using the Resend button.
- Select The claim has not been accepted yet and I need to resend it when prompted.
Troubleshooting
I get the following message when I click the Snipping Tool button
Windows Snip & Sketch tool could not be launched on the workstation. Instead, copy the image and use the Paste Image button. Alternatively, save the image to a folder and import it using the Add Image button.