Ortho Chart Setup
The Ortho Chart can have customized tabs and fields to meet the needs of an office.
In the Ortho Chart, click Setup.

Alternatively:
- In Ortho Setup, click Edit next to Ortho Chart Display Fields.
- In the Main Menu, click Setup, Display Fields, Ortho Chart.
Before entering information in the Ortho Chart, there are a few setup steps. The information defined during setup affects the tabs, columns, and info that shows in the ortho chart.
- Create Patient Fields. This information will show in the upper right of the ortho chart.
- To show Ortho Case, check Show ortho case information in the ortho chart in Ortho Setup.
- Define Ortho Chart tabs. Tabs can be useful to organize information.
- Define the columns of information that show in the Ortho Chart.
Add Tabs
Tabs are a way to organize ortho chart information. By default, there is one tab labeled Ortho Chart, but you can add many. Each tab can have the same or different columns showing.
- The name of the first tab determines the text on the Ortho Chart button in the Chart Module toolbar and the text of the Go to Ortho Chart right-click option when clicking on an appointment in the Appointments Module.
- When there are multiple tabs, the Ortho Chart button in the toolbar will include a dropdown for each tab.
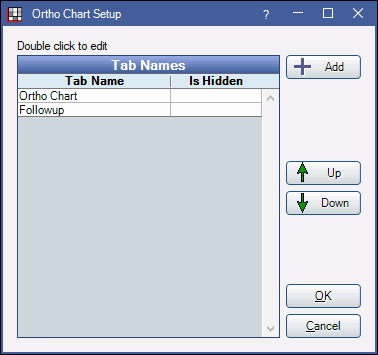
In Setup Display Fields, click Setup Tabs.

Use the Up and Down buttons to reorder tabs.
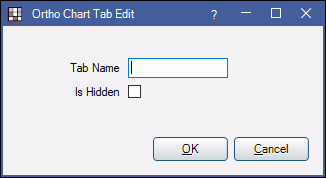
Click Add to create a new tab or double-click an existing tab name to edit.

- Tab Name: Enter the tab name, then click OK.
- Is Hidden: Check to hide this tab.
Add Columns to a Tab
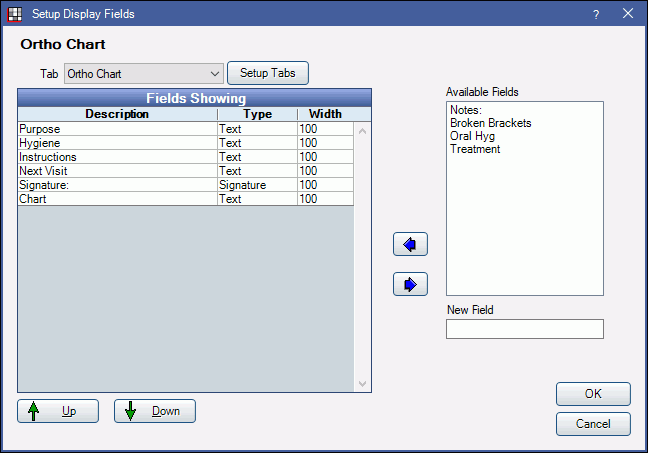
The columns that show on an ortho chart tab are also set in Display Fields. Columns can allow text entry, offer selection from a pick list, or show a signature box.On the Setup Display Fields window, click the Tab dropdown and select the tab.
The fields listed under Fields Showing reflect the columns that will show for the tab. The fields listed under Available Fields are options that are not currently showing.
Add or remove columns as needed.
- To add a field option that already exists, highlight it under Available Fields then click the left arrow.
- To add a field name that is not listed, enter the description in the New Field box then click the left arrow.
- To remove a field, highlight it under Fields Showing then click the right arrow. If the field has been used by any patient (i.e., data has been entered into the field) the user will be warned when attempting to remove the field. Click OK to continue removing the field. Click Cancel to keep the field instead.
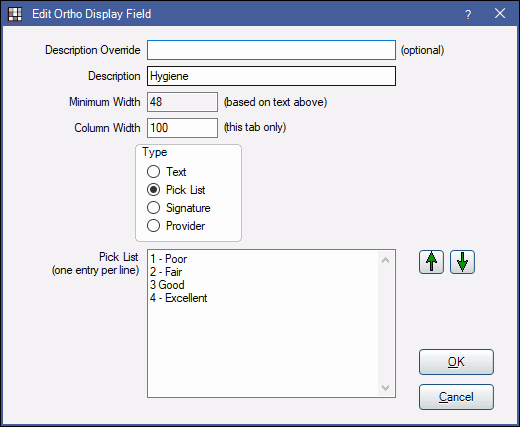
To edit a column name, customize width, or create pick list options, double-click the field under Fields Showing. 
- Description Override: When entered, the name of the column as it shows in the Ortho Chart. The override name will not show in Available Fields.
- Description: The name of the column as it shows in the Fields Showing list. Changing the description name on an existing field that contains data creates a new field with the new name which does not contain data. The original field moves into Available Fields and retains the original data.
- Minimum Width: A fixed minimum column width based on the length of the name(s).
- Column Width: Enter the actual width of the column. If the minimum width is more than the column width, adjust the column width to match for best visual results.
- Type: Select the type from the following:
- Text: Enter custom text into the field.
- Pick List: Create a pick list to choose from. A text box will appear to enter the pick list. When creating a pick list, the user clicks on a cell in this column to select from a dropdown. Enter one selection item per line. Use the up and down arrows to reorder items.
- Signature: Add a signature box to the ortho chart and this column will indicate when an electronic signature is valid.
- Provider: Displays the provider filling the chart.
Click OK to save.


