

Backup Tool
Use the Backup Tool to assist with making a manual backup of the database and RoyalDentImages folder.
In the Manage Module, click Backup.
Also see: Remove Old Data and Supplemental Backups
Use Royal dental Software's built-in tool to back up or restore data. Also see Backups. This tool can back up the following data:
- Royal dental Software Database: The MariaDB or MySQL (in older installs) database where patient data is stored. By default, it is located at C:\mysql\data\royaldental\.
- A to Z Folders: Scanned or imported files are stored here. Typically C:\RoyalDentImages. See Paths.
![]() See our webinar: Backup and Restore
See our webinar: Backup and Restore
- This tab is not available for Royal dental Software Cloud users.
- This tool is not supported for InnoDB databases.
- Backups should be run from the server that hosts your MySQL database. Running the tool from a workstation will likely result in an error, or the incorrect data being copied.
- If the tool fails, try again by running Royal dental Software as an Administrator.
This tool does not encrypt data, so consider an encrypted device or encryption software to ensure data is protected while in storage. See Encryption of Data at Rest and in Transit. To use the backup tool, you must have the security permission Backup.
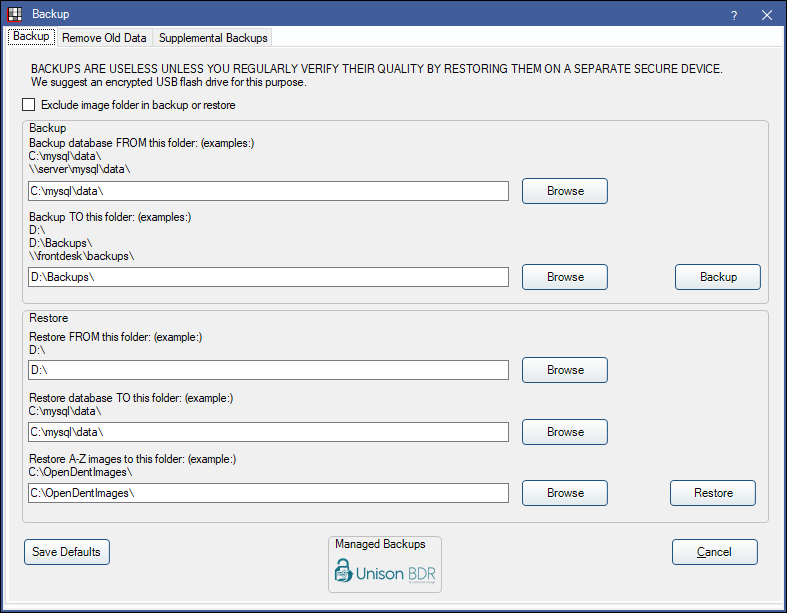
Exclude image folder from backup or restore: By default, the A to Z Folder is backed up and restored. To not include the A to Z folders in the backup or restore, check this box.
Save Defaults: Click to save the entered paths as the defaults.
Managed Backups: Unison BDR (Central Data Storage) is a preferred online backup service. Click the button to see more information. To remove this button, disable the Central Data Storage CDS Bridge then check Hide Unused Button.
Backup
To backup your data, first connect to the server, then insert the backup device (e.g., USB encrypted flash drive).
Backup database FROM this folder: Verify the database path to back up, it should contain the database currently connected. Typically it is C:\mysql\data\. Click Browse to select a different path. Only the connected database is backed up. Other databases in the path are ignored.
Backup TO this folder: Verify the drive or folder to back up the data to. For example, D:\. Do not back up to the same folder where the live database is located. We recommend utilizing a network path to another workstation or server in the office. Click Browse to select a different drive.
Click Backup. A message will display when the database backup is complete. If the image folder is also being backed up, this process will start next. Once the image folder backup is complete, another message will display. If the destination drive does not have enough space for a complete backup, a notification appears and backup stops. If Exclude image folder in backup or restore was checked, the backup process is complete after the first message.
Restore
You should test backups regularly to make sure they restore correctly. It is recommended to test backups by restoring them to a workstation not connected to the office network. The name of the database being restored must match the name of the database being used to run the restore tool.
Restore FROM this folder: Enter the path the backup is currently stored. For example, if the backup is on a flashdrive, it might be D:\. Click Browse to select a different path.
Restore database TO this folder: Enter the path to place the backup. Typically it is C:\mysql\data\. Click Browse to select a different path.
Restore A-Z images to this folder: If the A-Z folder was backed up, enter the path to restore it to. Click Browse to select a different path.
Restore: Click to restore the database. See below for detailed instructions.
Restore Instructions:
- If the restored database version does not match the current version of Royal dental Software, Royal dental Software will automatically close and you will have to relaunch.
- If you changed the name of the database from royaldental, you must also change it on the new computer before attempting the restore.
- On the restore computer, make sure you have a working copy of Royal dental Software that runs. If not, install the Trial version and make sure it is working properly.
- Insert the flash drive in the restore computer.
- Start Royal dental Software by running as an administrator, then open the Manage Module.
- Click Backup.
- In the Backup window, enter the restore paths.
- Restore FROM
- Restore database TO
- Restore A-Z images to this folder
- Click Restore. A message will ask if you want to restore from the backup on the flash drive (with date).
- Click OK and the restore process begins.
- As soon as the restore is finished, close Royal dental Software.
- Start Royal dental Software again.
- The Data Paths window will open. In the first line you will see the name of your office server. Change it to the name of your restore computer (C:\RoyalDentImages). Leave the other options as they are.
- Click OK and your Royal dental Software software should finish opening.
- Do not restore a backup over your live production database. Data loss can occur and will be irreversible.
- Do not replace tables within a database with tables from another database. You will have foreign key issues.